Get Shooting / 1 / My Favorite Lightroom Time Savers
- April 29, 2013 - by Marilou Jaen, in get shooting, photography, with 3 comments -
I’m starting the Get Shooting series to share some insight into how I shoot and how I work, and hopefully help you do the same. I hope you enjoy!
Lightroom is photo management and editing software from Adobe. I use Lightroom 4 to quickly organize and edit photos. It’s a life saver. And not just for pros. I strongly recommend it to everyone. By making organization easy, it will help you shoot more, post more, and get the most out of your photography.
To purchase Lightroom 4, click here.
For a great tutorial on photo editing with Lightroom 4 by Photography Concentrate, click here.
My Favorite Lightroom Time Savers
cuz who has time to waste?
Time Saver #1: Cull Your Images in Survey mode. (Cull is a fancy word for ‘Pick.’)
Culling just refers to the process of separating the keepers from the tossers. A common approach is to delete all the tossers. First off, this is bad for one’s self esteem (focusing on what you don’t like, versus what you like). And you learn more when you look for what you like – you start to see it as you shoot. I didn’t believe it either, but it works. You start to notice what draws you, when you look at 6 images and pick your favorite 1-2. Which tell the story? Which draw emotion? Are all your picks horizontal? Are they all the same viewpoint? Maybe this encourages you to shoot more dynamically. But focusing on your best, rather than deleting your worst is less overwhelming.
It’s also faster and less work. Select the first six images from the filmstrip at the bottom of your screen, and quickly pick the ones you like. Select them and hit the P key to Pick. Press 1-5 to star them as a Favorite. Then, highlight the next six in the film strip. At the end, you’ll have a nice collection of your keepers. From there, you can mark your Favorites, if you haven’t been doing that while culling.
One thing to mention is culling is not the time to edit. So hide your side menus by pressing the Tab key. You can always bring them back again by hitting the Tab key a second time. This just gives you more space and less distraction. It’s best to turn off the TV and Internet, too. Sorry, it’s just faster that way. And isn’t that the goal here?
I learned this culling technique from Jared Platt’s CreativeLive course on Workflow. But I found it a bit overcomplicated for the average person. So I’ve simplified it for the every day shooter. (If you are pro, I recommend Jared’ course, though!)
Once you’ve uploaded/blogged your images, it’s pretty safe to say you won’t need the rejects (shots you didn’t Pick). You can filter by Unflagged, select all, and delete those. If that scares you, you can export those to an archive folder for later deletion – just be sure to clean that archive folder out every now and then…
Time Saver #2: Only “touch” your favorites.
That is to say, ONLY keyword/edit/upload/post the shots you selected as Favorites. Keep the others around. You might need them later – for a project/album/scrapbook. But really, when are you going to be searching for a non-favorite shot. And if you are, you can still find them looking for your favorite shots… They’ll likely be in the same place.
(I’ll keep my Picks around in case I need them for story telling… But I won’t spend time on them otherwise.)
Time Saver #3: Use the Spray Can feature to quickly keyword.
You can select all images from a shoot in Grid view and add all shared keywords (e.g., Tropical Park, playground, Miami, FL, Florida…) But key wording photos with people’s names can be tedious.
The Spray Can tool can be found on the bottom menu in Grid view…
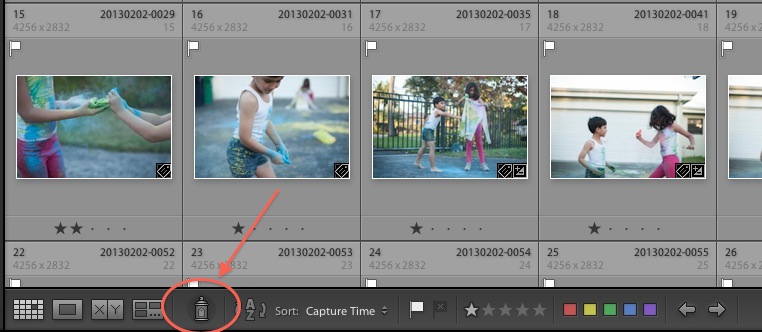
Click the can and you’ll get some new options. One is a menu of options for which you can use the tool. Here, I’m using it for Keywords. Next to that is a box, where you can write all the applicable keywords you will spray at once. I might enter “Isabel, Isabel Jaen, my kids,” for example. Then, I just spray over any image that includes that person (in this case, Isabel). You can drag it over many images without having to click each one. Whichever image you touch with it, while your left mouse button is pressed down, will be tagged with those keywords.
Learn more about the Spray Can tool in this great video by Julieanne Kost: http://tv.adobe.com/watch/the-complete-picture-with-julieanne-kost/quick-tip-the-painter-tool-in-lightroom-4/
3
- -
Great tips! Thanks for sharing. I love how you simplified it for everyday folk 🙂
These are all really good ideas. I’m excited to try them out. I’m especially excited to try the picking method and also the spray can. I am learning about hierarchical keywords so it might work to make My kids> Isabel Jean> Isabel a heirarchal set so you only have to type Isabel and the rest are automatically applied (but I haven’t tried it yet!)
Sounds great, I’ll have to check that out!